
In this step-by-step guide, we show you How to Grill the Perfect Steak. It covers picking the best cut of beef, seasoning well with salt and pepper, searing on the hot gas grill, and nailing the internal temperature and level of doneness so that your steak is perfect.

Raise your hand if you love to grill. Yes! We do too! But, do you know how to grill the perfect steak, every time? Thankfully, it is not hard and does not require fancy tricks or steak recipe. However, there are a few tips you must do to get a steak perfect every time. Here is what you need to know:
How To Pick the Best Steak
This may sound strange, but when choosing a steak, you need to think about location. Since meat is a muscle, the tenderness of a steak is related to how much work the muscle does. A good rule of thumb to remember is that beef gets more tender and flavorful as the distance from horn and hoof increases
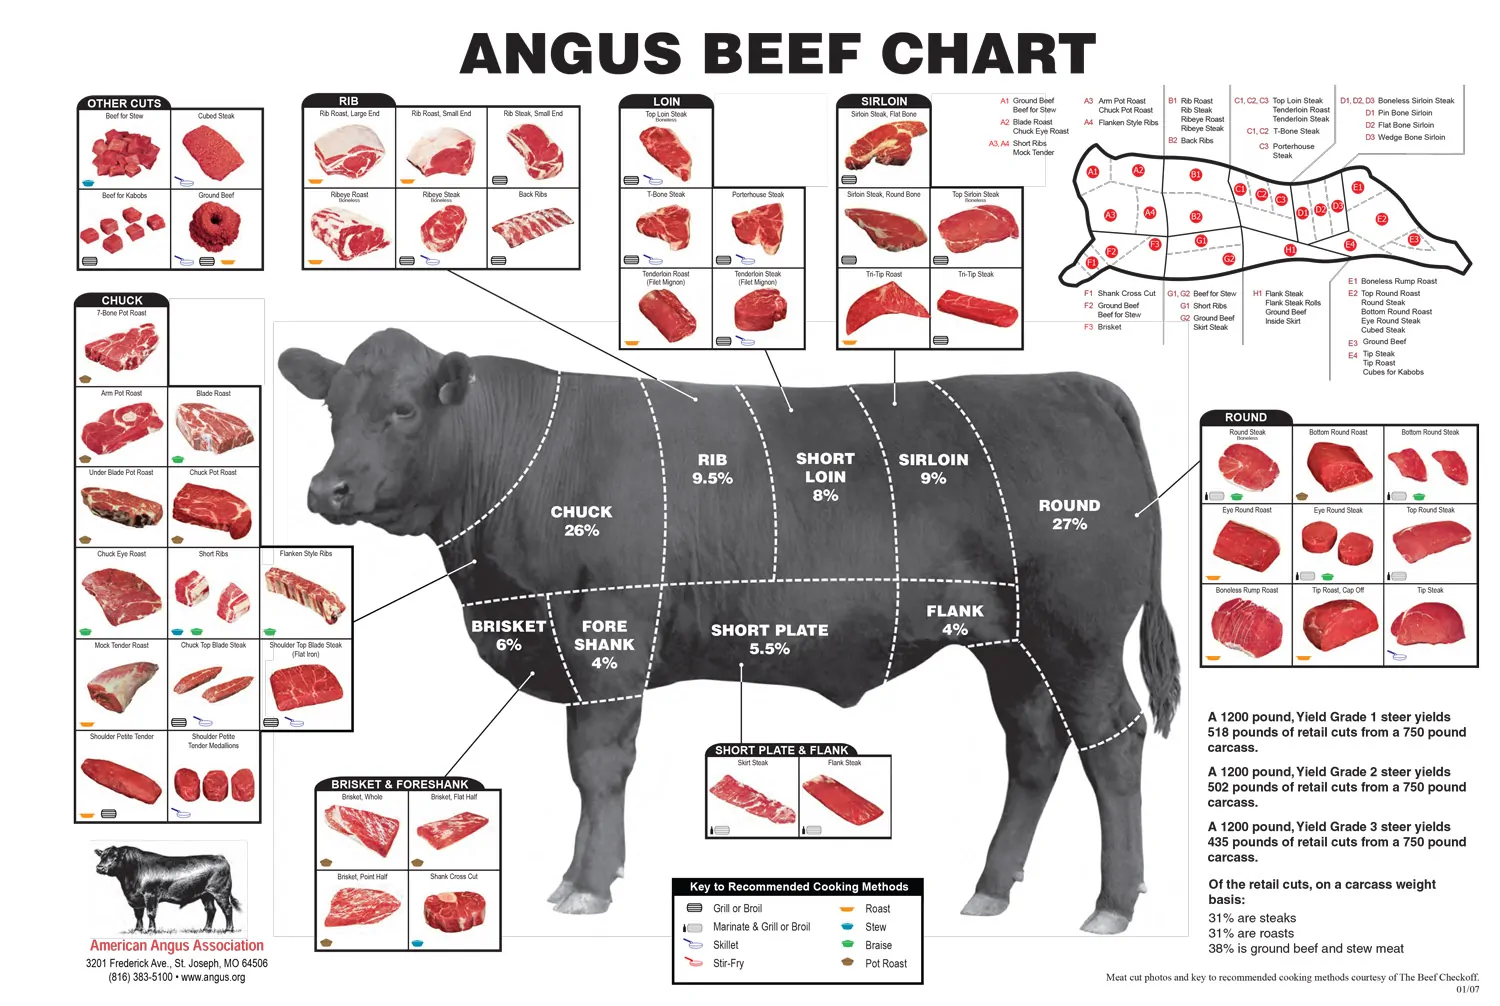
Since an animal is constantly using its legs and neck, those muscles are more developed and a steak from those areas will be less tender.
If you want a tender steak, you need to pick a steak from the loin section since that is the center of the animal and those muscles don’t work as much as others.
The Top 5 Best Steaks for Grilling
All steaks are different and have different qualities. Some steaks are known to be lean and others are known to be tougher. Some usually have a bone and others don’t. These differences make it important to choose the right cooking method with the cut of beef. Strip, Sirloin, Ribeye, T-Bone and Filet are the 5 best steak cuts for the grill. Here’s a little about each steak
- RIBEYE STEAK: A Ribeye Steak is a tender and flavorful steak that has the most marbling of any steak. It is cut from the rib area just behind the shoulder. For this cut of beef, less cooking time results in a more tender steak.
- STRIP STEAK: A Strip Steak is a steakhouse classic and an all-around favorite. It’s also known as a New York Strip steak or Kansas City Strip. It’s known for mild marbling and flavor. Strip Steaks are lean with a fine, tight grain that makes them moderately tender.
- TENDERLOIN STEAK: A Tenderloin Steak is the most lean, tender and expensive steak. It’s known for its buttery texture that will melt in your mouth, but it’s not very flavorful. It cooks much faster than other cuts since it’s so low in fat.
- T-BONE STEAK: The T-Bone is a combination of two steaks – Tenderloin and Strip – and the “T” shaped bone is what divides the beefy strip and tenderloin. A T-Bone and Porterhouse are very similar, but a T-Bone is slightly smaller.
- SIRLOIN STEAK: Sirloin is the large primal section of beef in the hip section of the animal, just ahead of the rump. A Sirloin Steak is a lean, inexpensive cut that makes it an all-around favorite. In addition to being a great steak, it’s also ideal for kabobs on the grill.
How to Choose the Grade of Beef
In addition to the beef cut, it’s important to consider the beef grade when selecting the perfect steak to grill. There are three main USDA beef grades — prime, choice and select. There is a huge quality, taste, and price difference between these meat grades, so being aware of the differences will save you money.
- Prime Beef comes from well-fed beef cattle and it has abundant marbling (i.e. the amount of fat interspersed within the meat). Cattle that are grain-finished will have more marbling than grass-finished beef. Prime steaks are known for being full of flavor, and very tender and juicy. Only about 2 percent of today’s beef is of the highest USDA grade, or prime, which, has the highest level of marbling. Prime beef is the most expensive option.
- Choice Graded Beef is very high quality, but has slightly less marbling than Prime. Choice beef is very tender and juicy. It is the most widely available grade of beef, and about 50 percent of beef is graded choice by the USDA. For everyday grilling, Choice graded steak is a great option.
- Select Graded Beef is typically leaner than the higher grades. It has less marbling and lacks some of the juiciness and flavor of the higher graded meat. The USDA grades about 21 percent of beef with the select grade. When cooking Select beef, it’s generally best to marinate before cooking.

Steak Seasoning
Now that you have your steak cut and beef grade selected, it’s time to prepare the steak.
A good cut of beef doesn’t need fancy seasonings that cover up the taste of the beef, but it does need salt. When salt is added to beef, it breaks down the beef’s muscle protein, draws moisture to the surface of the meat, and has a hydrating effect. It ultimately creates a juicier steak.
When salting steak, use ¾ teaspoon to 1 teaspoon per pound of beef. Salt about 1-hour before cooking, and be sure to apply the salt evenly to the front, back and side of the beef. An easy way to do this is to hold your hand about two feet above the steak, and make it “rain” salt. This will avoid having a concentration of salt in one area and allows for even coverage. Thicker cuts of steak will typically need more salt than thinner cuts.
Kosher Salt is our go-to salt when salting steak or roasts. We like it because it has large, coarse grains and the large granules cling to the beef when seasoning. The large grains also make it easier to pinch and sprinkle.
How Long to Grill Steak
The amount of time you grill steak will depend on the thickness of the steak and desired doneness. If you’re cooking a thinner steak, the cook time will be less than thicker steaks. If you like a medium-well steak, the cook time will be more than a medium-rare steak.
Although you can try and grill steak by time (see chart below), there’s only one way to get it right every time — you must use an instant read thermometer.
An instant read thermometer is the only way to tell a steak’s doneness, not the color or the “feel” of the steak. If you don’t own an instant read thermometer, it’s time to get one. Really, it is! Steaks are expensive and the only way to not ruin them is to use a thermometer. It will improve how you cook steak more than any other kitchen tool.
What is the Best Internal Temperature for Steak?
RARE – 120-129°F
Rare steak has cool-to-warm red center, and soft, tender texture. The USDA does not recommend eating rare meat, nor do many restaurants. However, if this is how you want to cook your steak, it’s an excellent choice for leaner steaks like top sirloin or filet mignon that don’t have as much fat to melt.
When cooking a steak to rare, it’s often seared on the outside at high temperatures (400°F) for a few minutes on each side. This results in a bright red center. When touched, the meat is soft and has almost no resistance to pressing with a finger.
MEDIUM RARE – 130-134°F
Medium-rare steak is the most popular level of doneness. Steaks served at this temperature are slightly warm, and have the best juiciness and texture. Medium-rare steaks are seared on the outside and the center has a dark pink red color. When touched, medium-rare steak gives only a slight resistance.
MEDIUM – 135-144°F
A medium steak is also a very popular option. It has a pink center surrounded by brown meat. Medium steak meets the USDA’s recommended internal cooking temperature. A medium steak is completely warm and has no visible dark red in the center. Pressing on a medium steak with your finger gives slight resistance and it springs back a little.
MEDIUM-WELL 145-154°F
A medium-well steak will have a mostly brown center, with a faint pink color in the hot center. The meat will be much drier and chewier because the juices inside the steak will evaporate during the cooking process. If you press on it with your finger, it will be firm with a considerable amount of spring.
WELL DONE -155-164°F
We don’t recommend cooking a steak to well-done because it becomes chewy and has very little flavor. At this level of doneness, the beef loses all its natural juices and the steak shrinks. The color will be entirely brown with no pink. When touched, it will be firm and springy to the touch.
Steak Doneness Chart
| Doneness | Temperature | Description |
| Rare | 120-129°F | Cool, bright red center Soft to the touch |
| Medium Rare | 130-134°F | Warm red center Beginning to firm up with red juices |
| Medium | 135-144°F | Warm pink center; outer portions beginning to brown Completely firm to the touch with red juices |
| Medium Well | 145-154°F | Slightly pink center Completely firm to the touch with brown juices |
| Well Done | 155-164 °F | No pink or red Firm to touch |
| Ground Beef | 160 °F | Fully brown throughout with no pink |
Note: The temperatures in this chart are final doneness. You need to pull your beef off the heat about 5-10°F before these temperatures are reached.
How to grill steak:
1. Prep the steak
About 20 minutes before grilling, remove the steaks from the refrigerator and let sit, covered, at room temperature — a cold steak won’t cook evenly. Then, pat the steak dry with a paper towel. Brush olive oil or canola oil on both sides and season generously with salt and pepper on both sides.
2. Preheat the grill
Heat your grill to high heat. We do this by turning all burners on high and lid closed for 10-15 minutes.
3. Place steaks on grill
Place the steaks on the grill. Sear the steaks, rotating and flipping often, to get a nice crust and grill marks. They should have a nice golden brown and slightly charred after approximately 4 to 5 minutes. Turn the steaks over and continue to grill 3 to 5 minutes until your desired temperature is reached. But remember, the temperature of the meat will continue to rise after it’s removed from the grill, so you’ll want to remove the steak when it reaches about 5˚ lower than the temperatures noted in the chart.
4. Test for doneness
The million-dollar question when grilling is “how long to grill a steak?” There is only one way to answer this question accurately and it requires a digital meat thermometer. Period.
Yes, we know there are ways to guess-timate if a steak is done by touch, color or cook time (and we’ve written about touch tests before), but none of these methods are as accurate as a digital meat thermometer. Ultimately, it will save you money and you’ll never ruin another amazing steak.
When using your digital meat thermometer, push the probe into the center of the steak from the top. Push it just past where you think the center of the steak is and then pull the probe out slowly. Watch the thermometer’s display as you do this; the numbers should lower slightly as you get closer to the center. The low temperature indicates the internal center of the steak. The lowest temperature you find is the best indication of the internal doneness of the steak.
6. Let it rest
This step is so important! Give your meat a chance to rest once it comes off the grill. This will ensure the juices stay in the meat rather than running right out. Typically, we transfer the steak to a cutting board or platter. Then, tent loosely with foil and let rest 5 minutes before slicing. Be sure to slice skirt steak against the grain for added tenderness.
7. Enjoy your steak!
The steak will be amazing as-is, but if you want to take it up a notch you can top with a pat of garlic herb butter or easy blue cheese butter before serving.
Perfectly Grilled Steak
Ingredients
- 4 1 to 1 1/2-inch-thick boneless rib-eye or New York strip steaks (about 12 ounces each)
- Kosher Salt & Freshly Ground Black Pepper
- 2 tbsp olive oil
Instructions
- About 20 minutes before grilling, remove the steaks from the refrigerator and letsit, covered, at room temperature — a cold steak won't cook evenly. Then, pat the steak dry with a paper towel.
- Brush olive oil or canola oilon both sides and season generously with salt and pepper on both sides.
- Heat grill to high
- Place the steaks on the grill. Sear the steaks to get anice crust and grill marks. They should have a nice golden brown and slightly charred after approximately 4 to 5 minutes. Turn the steaks over and continueto grill 3 to 5 minutes until your desired temperature is reached.
- Transfer the steaks to a cutting board or platter, tent loosely with foil and let rest 5 minutes before slicing.
One more thing!
Do you want to learn more about cooking steak? Here are a few other beef posts and recipes you may like. Plus, we have an entire ebook about beef.
- What Everybody Ought to Know About Beef Cuts
- Dry Rub or Marinade for Steak? Know What’s Best
- An Essential Guide to Beef: A Cattle Farm Shares How to Purchase & Prepare Beef
We participate in the Amazon Services LLC Associates Program, an affiliate advertising program designed to provide a means for us to earn fees by linking to Amazon.com and affiliated sites. See our disclosure policy for more details.


Nice to Meet You!
We're Matt & Jessica, fifth-generation cattle farmers & the owners of Clover Meadows Beef. Good food starts with knowing where it comes from. On our blog, you'll find easy beef recipes, cooking tips, stories of how we raise our cattle, and how to buy farm-fresh beef locally. Our goal is to make cooking beef easy so you feel confident cooking any cut of beef in your home kitchen.